Monday, December 26, 2011

Appetizer Alert: Goat Cheese, Sun-dried Tomato, and Pesto Terrine


Now, not everybody likes to cook.  But with this recipe, there are no excuses people!  This is a great, no cook, no fuss, make-ahead appetizer that is just plain yummy.  It's fun and has a little bit of a wow factor and just tastes better than buying hummus at Ralph's.  When I say it is easy, boy, do I mean it!


Ingredients:
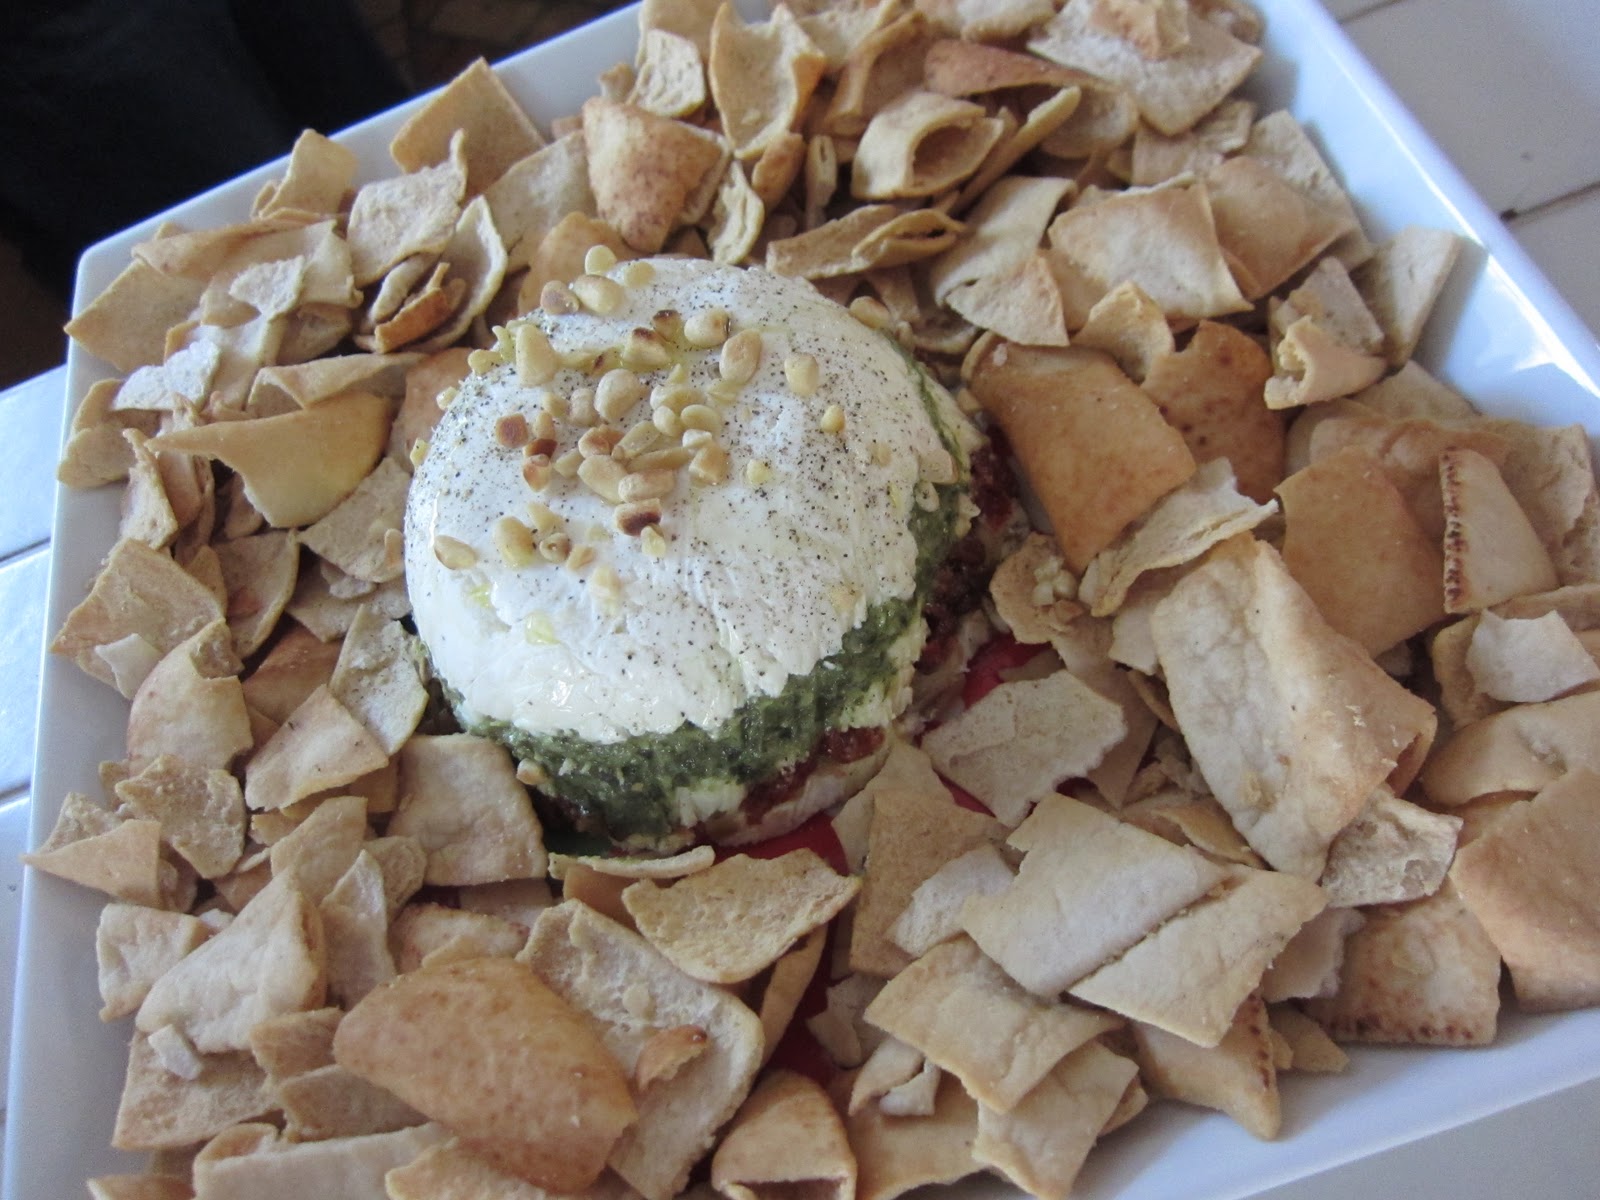
10 oz. of goat cheese
1/4 - 1/2 cup of heavy cream
3 tbs. of store bought pesto
5-6 oil-packed sundried tomatoes, drained and chopped
1/4 cup of pine nuts, toasted and finely chopped
extra virgin olive oil for drizzling
black pepper
pita chips or french bread for dipping


Directions:

Line the inside of a 2-cup sharply sloping bowl (about 4 inches across the top) with plastic; let the ends extend over the sides a few inches. In a mixing bowl, mash the goat cheese and 1/4 cup of the cream with a fork and season with 1/4 tsp. salt and a few grinds of pepper; add more cream if the cheese hasn’t softened.
Spoon about one-third of the cheese into the lined bowl and pack it into an even layer. Spread the pesto almost completely to the sides of the first layer of cheese. Top with another third of the cheese, the sun-dried tomatoes, and all but 1/2 Tbs. of the pine nuts. Top with the remaining cheese. Pack down, fold the plastic over, and refrigerate for at least 30 minutes (I like to make this the night before I need it and keep it in the fridge.)
Half an hour before serving, take the bowl out of the refrigerator. Pull on the edges of the plastic to loosen the terrine from the bowl. Invert the terrine onto a plate, drizzle with a little olive oil, and let sit for 1/2 hour to warm up.  Sprinkle with the remaining pine nuts, season liberally with pepper, and serve with pita chips or french bread.

Sunday, December 25, 2011

Say Ableskivers Three Times Fast . . .


Christmas time in my family means one thing and one thing only... Ableskivers.  If you have never heard of them before, don't worry, you are not alone.  An Ableskiver is basically a Danish pancake.  They are round, fluffy, yummy, bites of goodness.  My dad's grandmother Leta who lived to be 100 years old, was Danish and passed down this recipe.  We always make these at some point during the holiday season.  I will, say that you do need an Ableskiver pan for this recipe to work, but surprisingly the Ableskiver pan has made its way into stores like William Sonoma and Sur La Table.  So don't shy away from this family favorite!  I have seen Ableskivers filled with jam or nutella, but we like to keep it "old school" in my family and enjoy them simply with butter and powdered sugar.  


From my family to yours . . .


Great Grandma Leta's Ableskiver Recipe


Ingredients:
2 1/2 cups of flour 
1/2 tsp. of salt
1 1/4 tsp. of baking soda
3/4 tsp. of baking powder
2 cups of buttermilk
2 eggs separated (you will use both the whites and the yolks)
3 tbs. of melted butter


Directions:
Sift dry ingredients.  Add milk and mix well.  Add melted butter and mix.  Add yolk to mixture and beat.  In a separate bowl beat egg whites until stiff peaks form.  Fold the egg whites gently into the the batter.  This ensures a light and fluffy Ableskiver.  Don't manhandle the egg whites!  


To cook, heat up your Ableskiver pan over medium heat (see below.)


Add butter to each hole and allow to melt.  Add about a tablespoon of batter into each hole.  The signs of an Ableskiver ready to be flipped, are the same signs you look for in a pancake.  Look for bubbly edges.  You can use a toothpick to move the the half-cooked Ableskiver to see if the bottom is golden brown.  When it is, you use your tooth pick to help you maneuver the Ableskiver so it cooks on the other side, forming a ball.  Allow the second side to brown.  To check if it is done, insert your toothpick into the center and if it comes out clean take out.  Serve with butter and powdered sugar and enjoy!

Thursday, October 20, 2011

Dinner Party Worthy: Herb Mustard Glazed Salmon

For me, I need my fish to have a little "pizazz" in order for me to really enjoy it.  Salmon is great with lemon, salt, and pepper.  But let's be honest, switching it up every now and then never hurt anyone.  This recipe does just that.  Half-way through broiling, you simply add an "herby" mustard glaze and it takes the salmon to a whole other level.  Definitely dinner party worthy.  This same glaze would be great on a variety of fish and seafood.  The options are endless!  I apologize for the lack of picture here.  We were hungry tonight!


Ingredients (serves 4):
4 salmon filets (I have the fish guy at the market take the skin off and make sure there are no bones!)
1/2 teaspoon of rosemary, finely chopped
1/2 teaspoon of thyme, finely chopped
1 tbs. of dijon mustard or whole grain if you have it
1 tbs. fresh lemon juice
1 garlic clove
1 tbs. of olive oil


Directions:
In a food processor combine, rosemary, thyme, mustard, lemon juice, and oil.  Combine for 30 seconds.  This is your glaze.  Set aside.
Pre-heat Broiler.  Line a cookie sheet with foil.  Place salmon on foil and season with salt and pepper.  Broil for 2 minutes.  Remove from broiler and spread mustard and herb mixture liberally on each piece of salmon (don't skimp here, this is where the flavor is!)  Return to broiler and bake for an additional 5 minutes or until golden brown.  Keep a close eye on the fish near the last few minutes of cooking.  Before serving, squeeze lemon juice over the salmon.  If you are serving at a dinner party, garnish the serving dish with rosemary and thyme sprigs. 

Tuesday, October 18, 2011

30 Minute Meal: Easy Asian Noodles


It is Tuesday and after a field trip with thirty-four five year olds, I am tired, hungry, and most importantly I needed dinner to be ready.  And fast!  This is one of those meals that comes together so quickly and is quite satisfying.  The key to this recipe are the Yaki-Soba noodles that you can find in the refrigerated section of the grocery store near the tofu and other refrigerated asian noodles. The coconut milk creates a creamy, light sauce.  Like most "Cooking Girl" recipes, this one can be easily adjusted according to what you and your family like to eat.  Add more veggies, use a different protein, or simply make the noodles.  

Ingredients (serves 2 with leftovers):
Fresh Yaki-Soba Noodles with Seasoning Sauce (these come with 3 packages of noodles inside each bag.  I use all three packages and all three sauce packages for this recipe.)
4 carrots, finely chopped
4 scallions, finely chopped
1 cup of fresh spinach
1 clove of garlic, minced
1 can of light coconut milk
1 tbs. of soy sauce
2 tbs. of toasted sesame seeds (You can find these in the asian food aisle at your grocery store.  They come already toasted and are very affordable.  I add them to almost all of my asian dishes and they add a great nutty flavor.)
10 raw shrimp (peeled and deveined) 
salt and pepper
olive oil or sesame oil
optional: You can use chicken or beef instead of the shrimp if you like.  You can also add other vegetables to this dish such as bean sprouts, bok choy, and mushrooms.  I cook for a very picky husband, so I kept the recipe very simple.  

Directions:
Saute carrots and scallions until tender in a bit of olive oil or sesame oil if you have it.  Add garlic and continue cooking for 30 seconds (do not burn garlic!)  Add the shrimp, lightly sprinkle with salt and pepper, and saute for 2 minutes (it is okay if the shrimp aren't fully cooked at this point.)  Add the coconut milk, soy sauce, and the seasoning packets.  Combine and let come to a simmer.  Add the noodles, breaking them up with your fingers as you add them to the pan.  Reduce heat, combine, and simmer for about 5 minutes.  The sauce will thicken and reduce.  Add the spinach during the last minute of cooking.  Once spinach has wilted, sprinkle with 1 tbs. of sesame seeds.  Taste and add more soy sauce if you feel it needs a bit more salt.  Divide amongst your dishes and sprinkle remaining sesame seeds.  Done!  

Now go eat.

Sunday, October 16, 2011

Perfect Picnic Side-Dish: Orzo Salad with Roasted Asparagus, Sundried Tomatoes, Feta, and Basil


So I used to work in the Entertainment "biz" before I ventured into the world of Kindergarten.  One cold Winter on location in White Rock, Canada where we were filming JUNO, I made this great Orzo Salad.  We wanted something that would keep for a few days in the fridge and would be ready when we needed it.  After 15 or more hour work days, there was no time to cook at the end of the day!  So this was a quick fix, and a delicious at that.  


This recipe was inspired by Giada's Orzo Salad and the Orzo Salad at Whole Foods.  I added flavors and veggies that I think work well together and that I love.  But this recipe is easily adjustable.  If you don't like asparagus, add roasted zucchini. If you don't like sundried tomatoes, add fresh tomatoes or red peppers.  This is a wonderful go-to recipe for a picnic, BBQ, or make ahead side dish that can sit in your fridge all week. I am taking it today for a family football Sunday get together!


Ingredients:
3 cups of orzo or 1 package
6 cups of chicken broth (I like to add a few tbs. of Better Than Bouillon to water and you have instant broth!)
1 bunch of asparagus
1/2 cup of chopped sundried tomatoes
1/2 cup of chopped basil
3 scallions, finely chopped
1 4 oz. package of crumbled feta 


Vinaigrette:
1/2 cup of red wine vinegar
1 cup of olive oil (seems like a lot, but there is A LOT of orzo)
2 teaspoons honey
2 teaspoons salt
3/4 teaspoons freshly ground black pepper
1/4 cup of fresh lemon juice


Directions:
For Asparagus:
Pre-heat oven to 400 degrees.  Snap the ends off of the asparagus, toss in olive oil, and a sprinkling of salt and pepper.  Roast on a baking sheet for 20-25 minutes.  Take out of oven and let cool. Cut into small pieces and set aside.
For Orzo:
Add the broth to a sauce pan and bring to a boil.  Add the orzo, partially cover, and cook for approx. 7 minutes (al dente.)  Drain orzo and set aside.
For Vinaigrette:
Mix all ingredients with a whisk in the serving bowl of your choice.


Now here's the fun part!  Add the orzo, roasted asparagus, sundried tomatoes, basil, scallions, and feta to the vinaigrette. Toss gently to combine.  The orzo will still be warm at this point.  It will soak up all the yummy vinaigrette.  Taste and add a touch of salt and pepper if you feel it needs it.  I like to cover and refrigerate until you are ready to serve.  This dish is great served at room temperature as well.  Yum!

Saturday, October 8, 2011

Brown Sugar Bacon: A New Twist on An Old Favorite

Prepped Brown Sugar Bacon Ready For The Oven!

Bacon. Bacon. Bacon.  It is no secret that bacon is a timeless food that has captured the hearts of most Americans.  I feel that bacon has really taken center stage in the last few years and people are using it in crazy ways.  Bacon is so versatile and is not just a savory element anymore.  Bacon is everywhere now: on chocolate, in donuts, on cupcakes, just to name a few.  For me the jury is still out if I buy into those flavorings.  But here is a recipe that adds a little sweetness to bacon (without going crazy like dipping the bacon in chocolate!) and is a fun twist to a traditional ingredient.  The bacon turns out crispy and savory with just the right amount of sweetness!


Ingredients:
(serves 8, so adjust according to who you are cooking for)
16 slices of bacon
1/3 cup of firmly packed brown sugar


Directions:
Pre-heat oven to 350 degrees.  Line 2 baking sheets with parchment paper for easy clean-up.  Spray a wire rack with cooking spray and place on the baking sheet.  This little step with save your oven and your precious time cleaning the kitchen!  Lay the slices of bacon in one single layer on each rack.  Evenly sprinkle with brown sugar and press down so the sugar sticks to the bacon.  Bake for 30-35 minutes - rotating baking sheets half way through cooking.  If needed, finish off in the broiler for a few minutes, but be careful not to burn!

My Brunch Staple: Mom's Breakfast Casserole


This is my mom's recipe (so you know it has to be good) and a dish I grew up on.  This recipe never disappoints.  It is a great make ahead brunch meal.  And now that we are steadily approaching the holidays, this is a perfect dish to try if you are hosting family and friends.  My in-laws are coming into town this morning after driving across country from FL to CA.  I wanted to make a comforting brunch meal that didn't leave me in the kitchen for hours on a Saturday morning.  I prepped this yesterday evening (took about 10 minutes) and this morning I will pop it in the oven.  I love how easy this dish is and how people simply rave about it.  It really is one of the easiest recipes I have ever made and is great for a new cook.  Enjoy!


Ingredients:
10 slices of white "wonder" bread
1 8oz. package of shredded cheddar cheese
6 eggs
2-4 tbs. of unsalted butter, according to how liberally you want to spread each piece of bread.  I stick to around 2 tbs. (bring to room temp. before preparing)
2 1/2 cups of whole milk


Directions:
Grease a 9 x 13 baking dish.  Spread butter on each slice of bread (I like to just spread butter on one side only.)  Cut the crusts off and then cut into cubes.  Scatter the bread in the baking dish.  Next, whisk the 6 eggs and milk.  Then stir in the the cheese.  Leave about 1/2 cup for sprinkling on top.  Pour liquid mixture over the buttered bread and top with remaining cheese.  Let sit overnight.  This allows the bread to soak up the egg and milk mixture.  


The day you plan to bake this yummy dish off, pre-heat your oven to 325 degrees and let stand on the counter at room temperature for 30 minutes.  Then bake for one hour, uncovered.  I like to serve this immediately because out of the oven the dish is puffed, golden, and quite a crowd pleaser.  You can add other items to this dish like sausage or bacon, but I love the homey flavors of simply the eggs and the cheese.   

Sunday, October 2, 2011

My Comfort Food: Roast Chicken and Brown Sugar Acorn Squash

Sunday Dinner: Roast Chicken and Brown Sugar Acorn Squash 
(picture above is before roasting because I ate it too fast to remember to take a picture 
AFTER roasting!)


September 23rd marked the beginning of Fall.  I know this because I do the weather report with my little Kindergarten students every morning.  We have been waiting for September 23rd for some time now.  Fall means many things to me, but one of the things that I love most about Fall is Roast Chicken.  Now you can make Roast Chicken every month of the year, but it just seems to taste better in the Fall.  Maybe it is because of the comfort factor that a Roast Chicken brings or perhaps it is the way it fills the house with the smells of yummy goodness.  


The fun thing about Roast Chicken is that you can make it a million different ways if you follow a few basic steps.  Below is my recipe for a great Roast Chicken and also some variations you can apply according to your tastes and the season.  I followed Thomas Keller's oven temperature and timing suggestions this Sunday and the results were wonderful.  I feel that a Roast Chicken recipe does not and should not have to be precise.  That is the fun of roasting a chicken.  As long as you season generously and add a few flavoring agents, it will taste like home.  This meal can bring the sunshine out no matter how cold it is outside.


My Go-To Roast Chicken
Ingredients:
One 4 - 4 1/2 pound chicken
Salt and Pepper
1 Head of Garlic
A few Sprigs of Rosemary
A few Sprigs of Thyme
1 Lemon quartered
Sprinkling of Paprika
Olive Oil


Some optional variations if you are feeling a little crazy:

  • Add vegetables (whatever is in season and that can hold up to the roasting process) to the bottom of your cooking vessel (i.e. onion, carrots, turnips, leeks, new potatoes, sweet potatoes, parsnips, etc.)
  • Sometimes I like to rub garlic and herbs under the skin of the breasts to really help get the flavor into the bird.
  • If you are out of fresh ingredients, season with what you have on hand (i.e. Lemon Pepper, Garlic Powder, Paprika, Salt and Pepper.)  
  • I have even marinated a whole roast chicken for a few hours before cooking, which is not traditional, but adds great flavor.  The marinade I pulled together included chopped garlic, rosemary, thyme, olive oil, dijon mustard, salt and pepper.
  • Fresh Sauce:  After eating at Tyler Florence's restaurant in Napa (Rotisserie and Wine), I was inspired to re-create his "Salsa Verde" as a great sauce to pour over the roast chicken when serving.  In a food processor add 2 tablespoons of capers, a handful of parsley, a few cloves of garlic, the juice of half of a lemon, 1 tablespoon of red wine vinegar, 1 tsp. of lemon zest, salt and pepper (to taste.)  It is almost like a herby, lemony vinaigrette.  Taste the sauce and adjust the ingredients according to your liking.  If you don't like capers, leave them out.  Be your own chef!

Directions:
Pre-heat oven to 475 degrees.
Clean the chicken and remove any innards that are still in the cavity of the chicken.  Pat dry.  Season the cavity and the outside of the chicken generously with salt and pepper.  Don't skimp here!  Now stuff the bird with a head of garlic cut in half, the lemon (squirt some of the juice on the outside before adding it inside), and the herbs.  I drizzle with olive oil, but you can spread with butter if you are feeling especially frisky.  


You can cook a roast chicken in many different vessels.  I have used a roasting pan on or off the rack.  I have used a dutch oven (shown above) or simply a large  oven-proof pan.  If you have kitchen twine, this is a good time to tie up the legs.  There are techniques if you want to be super fancy, but I like to easily wrap the string around the legs, so the legs are pushed together and simply make a knot or a bow if you are girly (insert wink.)  If you don't have twine, skip that step.  Place the chicken your cooking vessel and tuck the wings under the body.


Roast at 475 degrees for 25 minutes.  Reduce the heat to 400 degrees and roast for an additional 45 minutes or until the temperature registers 160 degrees in the meatiest portion of the bird.  I like to use a thermometer to help with the guessing game of whether or not it is done.  If necessary, return the bird to the oven for more roasting - check every 5 minutes or so.  Depending on the size of the bird, the cooking temperature varies.  And the more you make Roast Chicken, the easier it will be for you to determine when it is done.  You can cut a meaty portion of the bird (i.e. breast) and if the juices run clear it is ready, but I usually like to take the help of the thermometer.  If you find that your bird is browning quickly during the second portion of cooking, simply add a loose layer of foil.  


Transfer the chicken to a cutting board and let rest for at least 10-15 minutes.  You want all those juices to be able to 
re-distribute into the bird.   If you cut too soon, the juices that you worked so hard to create, will run out and leave the bird dry.  Now if you are inclined to cut the bird into pieces and know how - more power to you!  I usually like to take the easier route and do so by pulling the meat off the bones and arrange on a platter.  I usually can get the breast off easily by sliding my knife under the breast and cutting into uniform pieces.  The rest of the meat looks a bit rustic on the platter, but that was my goal all along!


Don't be intimidated!  Roast Chicken is the most wonderful, comforting meal that stretches a buck and can provide the best left-overs.  It does take a little extra effort, so I like to save this kind of a meal for a weekend or Sunday Supper. 


Brown Sugar Acorn Squash
Ingredients:
1 medium acorn squash, halved and seeded (although this recipe works well with butternut squash and spaghetti squash as well but cook according to the sticker on the squash.  Times may vary depending on the size of the squash)
1 tablespoon butter
2 tablespoons brown sugar


Directions:
Pre-heat oven to 400 degrees.  Place seeded and halved acorn squash side by side in a casserole dish, cut side up.  Score the acorn squash by simply cutting down the insides of the yellow flesh a few times.  This allows the butter/brown sugar mixture to get inside of the squash.  Fill the dish half way up the squash with hot water.  Divide butter and brown sugar evenly among the acorn squash and spread evenly among the yellow flesh.  Bake for approximately 1 hour to 1 hour and 15 minutes until you can easily pierce with a fork.  I like to serve these as is.  The acorn squash almost looks like a little bowl.  You can easily scoop out the filling with a spoon and make sure to drizzle any additional butter or brown sugar that accumulates in the bottom of the squash to each and every bite!  

Sunday, September 25, 2011

Caprese on a Stick!


This recipe is a no-brainer and a perfect addition to any meal.  I first made this recipe when hosting a bridal shower for one of my closest friends.  I wanted to serve something fresh, light, and a dish I knew most people would enjoy.  The balsamic reduction really gives this dish the extra spunk it deserves.  I chose to put them on a stick because, well, isn't everything cuter on a stick?  If you are making this as a side dish to a weeknight meal and the thought of skewering makes you want to run for the hills, simply add the ingredients in a bowl and toss in the balsamic reduction.  It's okay.


Ingredients:(nothing is too exact for this recipe, so adjust according to the number of people you are serving and your taste)


Carton of grape tomatoes (If you can find orange, yellow and red tomatoes, great!  After all, we eat with our eyes first.)
Carton of Bocconcini (These are small mozzarella balls packed in water.  If you can't find them, just cube fresh mozzarella.)
Basil, a handful (I told you this wasn't exact!)
3/4 cup of balsamic vinegar
1 1/2 tbs. of sugar
Salt and Pepper
Wooden Skewers (break in half)


Instructions:
Boil the balsamic vinegar and sugar in a saucepan over medium-high heat until reduced, stirring occasionally, about 10-15 minutes.
Next, simply assemble your skewers.  Alternate tomatoes, mozzarella and basil.  Assemble on a platter and drizzle the balsamic reduction over the top.  I finish the dish with a sprinkling of salt and pepper.  Garnish the plate with basil if you are feeling fancy.  Plus, who doesn't love a garnish?

Skinny Chicken Piccata


Chicken Piccata makes its way into the Mollo weekday dinner line-up quite often.  Everyone seems to have their version of Chicken Piccata.  This is mine.  It is a light, low in calories, and full of flavor.  Yes, you can add more butter, oil, and cream, but in my opinion, you don't need to.  Everyone is looking for a new chicken recipe to try out.  Well folks, look no further!  


Ingredients:

  • 2 skinless and boneless chicken breasts pounded flat
  • Salt and Pepper
  • Flour for dredging
  • 2 tablespoons unsalted butter
  • 1 tablespoon of extra virgin olive oil
  • 1/3 cup fresh lemon juice
  • 1/2 cup chicken stock
  • 1/4 cup capers, rinsed
  • 1/3 cup fresh parsley, chopped
  • Parmesan Cheese

Instructions:

I first pound out my chicken out on my "chicken board" until the chicken is about 1/4 of an inch thick.  Use anything in your kitchen that you can get your hands on and let out some aggression.  Season chicken with salt and pepper. Dredge chicken in flour and shake off excess.
In a large skillet over medium high heat, melt 1 tablespoon of butter with 1 tablespoon olive oil. When butter and oil start to sizzle, add the chicken and cook for 3 minutes. When chicken is browned, flip and cook other side for 3 minutes. Remove and transfer to plate. 
Into the pan add the lemon juice, stock and capers. Return to stove and bring to boil, scraping up brown bits from the pan for extra flavor. Add salt and pepper to your liking.  Return all the chicken to the pan and simmer for 5 minutes. Remove chicken to platter. Add remaining 1 tablespoon of butter to sauce and whisk. Pour sauce over chicken, add parsley and as much parmesan cheese as you like.  I like to serve this with a whole wheat pasta and something green.

My Favorite Dessert: Ina's Brownie Pudding


  • This recipe might just be my favorite dessert of all time.  I cannot take credit for this one.  This is an Ina Garten masterpiece.  I did tweak this recipe a tad, because let's be honest, sometimes Ina's ingredients are simply too fancy, expensive, and hard to find.  

  • This is a perfect mix between a molten chocolate cake, a brownie, and a souffle.  If you love chocolate, this is to die for.  It is very rich and decadent, so you don't need a ton of it, but it might be one of your favorite dessert bites of all time too.  I pair it with fresh vanilla whipped cream or vanilla ice-cream.  I feel it needs one or the other to help balance out the sweetness.  When baked, the top will have a hard crust that you can almost tap, but underneath that crunchy layer, is the most ooey-gooey-chocolately goodness.  

  • This is a true crowd pleaser.  Many times you are asked to bring dessert to a get together and so many people have so many different tastes, you just feel stumped on what to bring.  Yes, we can take a trip to Ralphs and grab a cake, but this takes no time at all.  I like to whip up the batter (probably takes 20 minutes from start to finish) and either bake it for an hour right then and there, or if I am going to someone's house, I pop it in the oven for an hour when we are eating dinner and it is ready!  This is easy, simple, and worth the small amount of effort.  

  • Get cooking!
Ingredients:
  • 1/2 pound (2 sticks) unsalted butter, plus extra for buttering the dish
  • 4 extra-large eggs, at room temperature
  • 2 cups sugar
  • 3/4 cup good cocoa powder
  • 1/2 cup all-purpose flour
  • capful of vanilla extract
  • Vanilla ice cream or fresh vanilla whipped cream, for serving

Directions:

Preheat the oven to 325 degrees F. Lightly butter a 2-quart (9 by 12 by 2-inch) oval baking dish. Melt the 1/2 pound of butter and set aside to cool.
In the bowl of an electric mixer fitted with the paddle attachment, beat the eggs and sugar on medium-high speed for 5 to 10 minutes, until very thick and light yellow. Meanwhile, sift the cocoa powder and flour together and set aside.
When the egg and sugar mixture is ready, reduce the speed to low and add the vanilla and the cocoa powder and flour mixture. Mix only until combined. With mixer still on low, slowly pour in the cooled butter and mix again just until combined.
Pour the brownie mixture into the prepared dish and place it in a larger baking pan. Add enough of the hottest tap water to the pan to come halfway up the side of the dish and bake for exactly 1 hour. A cake tester inserted 2 inches from the side will come out 3/4 clean. The center will appear very under-baked; this dessert is between a brownie and a pudding.
Allow to cool and serve with vanilla ice cream or whipped cream.

Wednesday, August 17, 2011

Surprising Side: Roasted Balsamic Brussels Sprouts with Toasted Almonds and Plumped Raisins

My posts today have been annoyingly healthy.  My husband challenged me to post something fattening in the near future.  So stay tuned.  


On another front, one of the perks of being a teacher is time off during the summer.  This is something I am definitely not used to.  So I did what any other girl would do with her time off on a Wednesday.  I took a yoga class, browsed the Farmer's Market, and cooked lunch.  Now this is not a normal lunch, but hey, I'm on vacation.  I recommend this as a great side to any meal.  


I was inspired to make this dish after tasting a salad at a great restaurant on Main Street (M Street) that didn't roast the brussels sprouts, but rather kept them raw with these flavorings.  I personally love the way the brussels sprouts (which is a notoriously hated vegetable), transform and caramelize into something so yummy.  I found myself going "cave-man" style which resulted in me ditching my fork and shoveling this dish into my mouth with my hands. Alone. In my living room.  Classy.  


However, I urge you to try this recipe.  If you love brussels sprouts, you will love this.  If you haven't had them since you were forced to eat them as a child and they were steamed or boiled, then give it another try.  It is quite the surprising side!


Ingredients:
(2 servings)
brussels sprouts (eye ball how much will feed your family.  you may need to add a bit more of the following ingredients if you are feeding 4 people or more.)
2 tbs. of balsamic vinegar
1/2 tbs. olive oil
1/4 cup of raisins
1/4 cup of almond slivers
Salt
Pepper
(If you are feeling extra crazy, go ahead and add crispy bacon bits to this.)


Directions:
Pre-heat your oven to 400 degrees.  If your brussels sprouts aren't already cleaned, I like to take off the first layer, cut the bottoms off and throw away.  I then like to peel off a few of the outer layers of the brussels sprouts (these are the bits that get extra crispy in the oven) and then I either halve or quarter the brussels sprout center depending on how large they are.  Place on a cookie sheet.  I add the olive oil, balsamic vinegar and a sprinkling of salt/pepper.  Toss to coat (don't be afraid to use your hands, "a chef's best tool" - glorious ina garten) and roast for 15 minutes.  I like to flip them with a spatula half way through cooking.  At 15 minutes I add the raisins and almonds and bake off for 5 more minutes.  This ensures the almonds toast and the raisins plump.  If you aren't a fan of nuts or raisins, simply eliminate.  If you would like different options, try a different dried fruit and perhaps pecans, walnuts or pine nuts.  The different textures of this side dish really transform the brussels sprouts.  

SO L.A. : Kale Chips and Go Green Smoothie

One of the requirements of living in Los Angeles, is eating weird green food to make yourself feel healthy.  Well not really, but anywhere else in the country would definitely think these next few recipes are simply just silly.  But actually, they are quite good and GOOD for you!  


Here are some of my favorite snack recipes with the health factor kicked up a notch! 


Kale Chips 
(a.k.a. Hollywood's Version of Potato Chips)
A good friend of mine turned me onto these wonderful morsels.  I am always trying to incorporate different kinds of greens into my diet because they are so good for you.  But they generally taste like you are eating grass.  This recipe is a total fake-out and it will surprise all of your friends.

Ingredients:
Kale (buy a few bunches)
Olive Oil
Salt (use only a pinch)
Pepper

Directions:
Pre-heat oven to 400 degrees.  Wash and dry Kale.  Tear off the leaves from the stems into smaller pieces.  Drizzle with olive oil and salt(no need to drench with oil - after all, this is a low-fat snack!)  Toss on a baking sheet and bake for 10-15 minutes or until crispy.  Don't let them turn too dark in color, so keep an eye out! You will be eating them like potato chips!


Go Green Smoothie
A well known trainer in Los Angeles turned me onto this smoothie. Why not add something green to your smoothie from now on?  You hardly taste the spinach and you feel like you've done something good for yourself after drinking it.


Ingredients:
Handful of your favorite frozen fruit
1 Banana (optional, but it adds creaminess to the smoothie.  you can definitely add any of your favorite fresh fruit to this as well.)
1/2 cup of non-fat yogurt (I prefer greek yogurt, but flavored yogurt works great too.)
Drizzle of honey
Splash of orange juice to get things going in the blender
and . . . (drum roll please . . .)
Lots of and Lots of fresh spinach!


Directions:
Add all items to the blender and blend away!  You can add as much or as little spinach as you like, but you can really pack in quite a bit.  If you need to add more orange juice if the smoothie is too thick, go for it.  This is not a precise recipe.  Don't be turned off by the color.  Depending on the type of fruit you use, the smoothie outcome could be green or a little brown.  Just ignore and drink!  You will be getting most of your fruits and vegetables for the day in one drink!


Sunday, July 31, 2011

Not Your Average "Fancy Nancy" Pizza: Arugula Topped, Carmelized Onion, Fig Jam, and Blue Cheese Pizza

I took a cooking class this week with some friends to learn some fancy knife skills.  The best part of the class, was this pizza.  It is easy to make, but so fancy!  My Kindergarten students would call this "Fancy Nancy" and for those of you with kids, you know what I mean.  For those of you that think I have lost my mind, well that might be true as well!  And for those of you that can't get enough of a Father's Office Burger (you know who you are), this pizza has a similar flavor profile and forces a verbal reaction when taking a bite.  Eat. With. Caution.


The combination of flavors with the sweet onions and jam, coupled with the salty prosciutto and the unique flavor of the cheese, make the perfect bite!  If you don't like onions or figs, don't run away!  The onions take on a whole new attitude by carmelizing them and the fig jam really just adds a touch of surprising sweetness.  Adding arugula at the end, freshens this pizza up.  


I have made my own pizza dough and enjoy it, but for the sake of your sanity and precious time, just buy the pre-made stuff (especially if you are entertaining or having a nice week-night meal - simplify. your. life.)  I love the idea of this pizza as an appetizer.  It has the "wow" factor!


Ingredients:
1 package of pre-made Pizza Dough (Whole Foods and Trader Joe's have great dough.  And if you have a favorite local pizza joint, they can probably sell you their dough as well.)
Fig Jam
Bunch of Arugula
Blue Cheese or Goat Cheese if you prefer
3 red onions, sliced very thin
5-8 slices of prosciutto
3-4 tbs. of water


Directions:
Pre-heat your oven to 500 degrees.  Place 2 cooking sheets in your oven and let heat (you want your pans hot - this will create a yummy crust to your pizza.)


First things first, carmelize the onions.  Add a bit of olive oil and the onions to a hot saute pan over medium-high heat.  Wilt the onions and stir, fairly consistently until you see the onions break down.  Make sure to use a wooden spoon and scrape up the brown bits on the bottom of the pan.  Brown bits = flavor!  Add one tablespoon at a time of water to the pan to help wilt the onions and to aid in getting those yummy brown bits off of the pan and into your onions.  This process will take about 10 -15 minutes.  Be patient!  Your onions should have a deep golden brown color and should be completely soft.


Take one package of dough and divide in two.  I find the easiest way to manhandle the pizza dough is in my hands, moving it around and almost hanging it down to stretch the dough out.  Take your hot pans out of the oven and drizzle some oil on the hot pans.  Place your dough on the pans (one for each pan.)  If you like a thicker crust, don't divide the dough in two and simply use one pan to create one pizza instead of two.  I find it is easier to get a rectangle pizza, than trying to create the perfect circle.  The pan is hot, so be careful adding your toppings!


This is the fun part.  Add your carmelized onions over the dough (you want a nice layer of onion.)  Then add your fig jam - add about 4 tablespoons, but be your own chef and add more if you like. Then drape the prosciutto over the top of the jam.  I try not to lay the prosciutto perfectly flat.  Then add your blue cheese crumbles over the meat (again, add as little or as much cheese as you prefer.)  


Bake for 10-15 minutes or until the cheese is bubbly and begins to brown.  I transfer the pizza onto a wooden cutting board, top with arugula and cut into squares.  I like the rustic serving dish of a cutting board for pizzas.  Enjoy!